Creating custom context menu for Windows file explorer.
Making tx, rescaling image, displaying alembic content all as fast as a right click can be.
I had always been a fan of contextual menu in interfaces. They are a very fast way to run various processes on a selected item. And at the same time you don’t have to remember which action you can run on the item, or how the action was named. You right click and everything doable is available a few pixels away from your cursor.
And I had come to the point where, while browsing my files in the file-explorer, I found that I needed to run a specific tool on a file. And then 10 min later again, and the next week again … Each time I had to open the tool (so depends how easy it is to find its executable on your system), copy the path of the file, and give it to the tool. Huh … too long I wish I could automate that.
A bit of research, and of course you can. You probably noticed that some applications you install doesn’t refrain themselves for adding actions to the context menu, so why not you ?
Why ?
You might have clicked on this article because you already knew it sounded like something you wanted to do at some point. But for the others why would you even need to add new actions to the context menu ?
To get an example that will be familiar for the 3d artists out there let’s take
the case of makeTx. If you are using Arnold you know what I’m going to
talk about. For every texture you use in your scene, Arnold will usually
generate a version of it in its own format called tx (nearly every
render-engine has its own). This process is
usually done automatically when you click render but there is multiple reasons
it can goes wrong, or might not just be the behavior you want. The
solution to fix it is to manually generate the tx files. To achieve that you
can use the makeTx.exe tool that is found alongside the Arnold installation.
The particularity with that tool being that it is a Command Line Interface, which mean you dont need to go through an interface to execute actions inside.
At the end of this article, you could had something like this :
Command Line Interfaces programs
A Command Line Interface program is made to be interacted with from the command line, and not from a graphical interface like most programs. If you are not familiar with CLIs, they are going to look very unpleasant to use compared to a GUI. But their power will be found in the flexibility they offer, especially for automatizing tasks. It’s like you were ordering the program to perform an action by describing it in a sentence.
This is will be useful in our case, because this means that by passing the “right sentence” to makeTx, he could generate a tx from the file that has been selected from the right-click !
If you ever tried to double click on a .exe just to see a window open and close immediately, it’s probably because it was a CLI. By double clicking on it you executed it, it execute the task it was made for (in our case nothing because you didn’t gave it any argument), and then close once finish.
To first see what’s going on when you don’t give it arguments, let’s open the
command line. On Windows, this can be achieved using Win + R then typing
cmd and enter. You can also just search for Command Prompt in the
Windows search bar.
Then to execute our program you need to pass the path to its executable. Easiest way is just to drag and drop the executable from the file explorer to the command prompt. You can also just copy and paste its path.
Then press enter to start executing it.
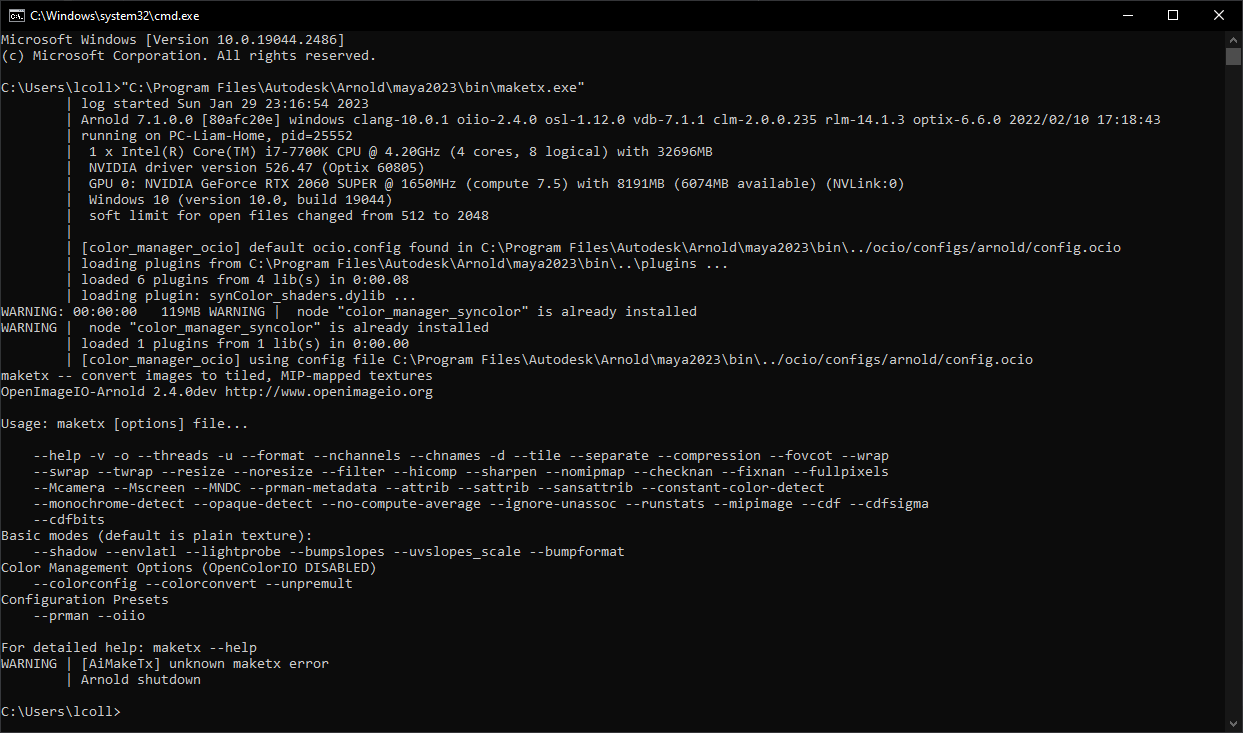
Without any argument, most CLI will just display their documentation. Which we will anyway need to open at least one time to make sure we know what arguments the tool expects.
maketx.exe
Alright, how does makeTx works ? You can see on the line Usage : maketx
[options] file... that it expect the path of the file to be provided last,
and before some options.
The options are listed just under, and there is a lot of them. Usually options/arguments are documented but here we only have their name to guess what they are doing.
But don’t worry, no need for playing the guess game of which options does what we want. How ? Well you know Arnold already auto-convert the tx files for you, so it knows which options to use. And thankfully, the whole command used to generate the tx file is actually embedded in the tx’s metadata !
But how do I retrieve the tx’s metadata ? Well, by using an other CLI that we are going to see a bit later (oiiotool), I can retrieve it from any existing tx that have been previously generated. Here is a line stored in the metadata of a tx file :
Software: "OpenImageIO-Arnold 2.4.0dev : maketx G:/whatever/sources/FREDDY_Shoes/texturing/publish/textures-4k.v04\FREDDY_Shoes_Diffuse_Color_1001.exr --opaque-detect --constant-color-detect --monochrome-detect --fixnan box3 --oiio --attrib tiff:half 1 -v -u --unpremult --oiio --format exr"
Seems there is a lot of options used ! One important thing to keep in mind is
that those options vary depending on what kind of texture you are converting
and how the “texture node” in the source DCC is configured. The most notable
variable option being --colorconvert (explained later), used to convert the
input file to another colorspace that might or might not be specified.
Anyway we have what we need, the whole command required to convert a file to tx. We can now have a look at how to create the context menu !
Editing the registry: Basics
Unfortunately, there is no really simple and easy way to add actions to the context menu (though there might be if you look for them on internet), at least for this article, we will have to edit the registry.
To keep it simple see the registry as a file hierarchy like we use daily, but instead of file, we are manipulating “keys” that have different values set on them. You can access keys by their path, like you would do for a file.
If you ever have to use it, you know it’s not easy to find what you are looking for. Or you are probably aware that editing the wrong stuff inside can easily break parts of your system.
To mitigate those issues we will be using .reg files. Instead of browsing
the registry Editor we specify how we want to edit in the file. The advantages are :
- They allow for a reproducible process. That means that if your reformat your system, you don’t have to remember which registry key you created. Just execute the reg file again.
- You can easily create a copy of the initial reg file that does the inverse, meaning removing the keys instead of adding them.
Creating the .reg file
As a first step, create a blank new file like a .txt and just replace the
extension with .reg (you might need to display file extension in the View
menu of the file explorer if not set already).
Then right click and open the file with any text/code editor (make sure to not click on it else you will be executing it !).
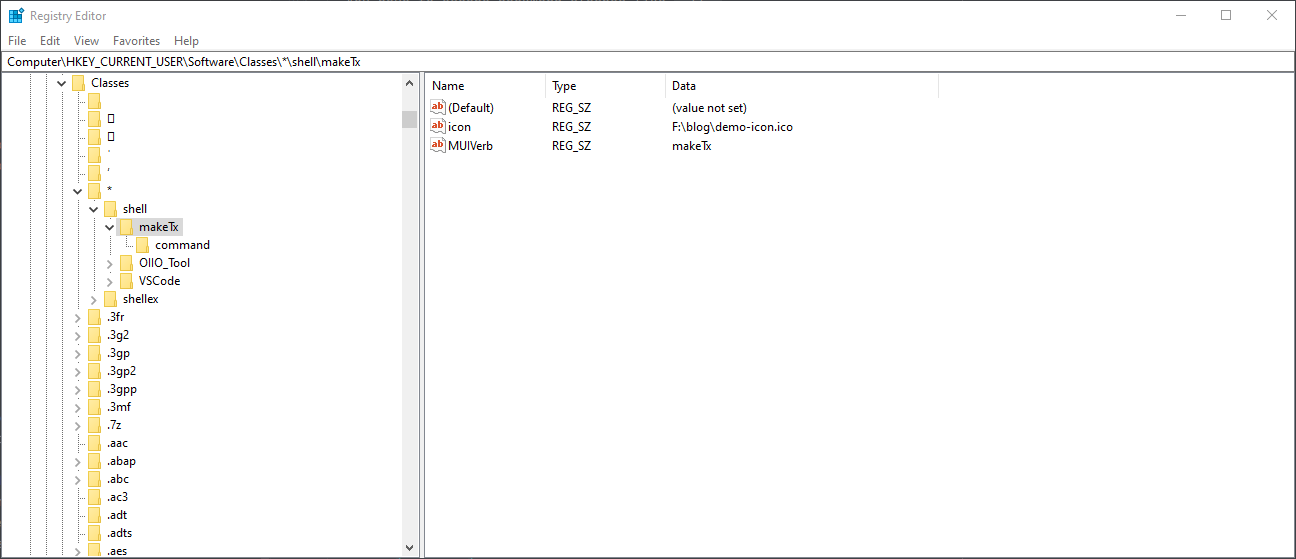
Just so you get an idea of the finished product, here is an example of what we will be putting in that reg file :
Windows Registry Editor Version 5.00

[HKEY_CURRENT_USER\Software\Classes\*\shell\makeTx]
"MUIVerb"="makeTx"
"icon"="F:\\blog\\demo-icon.ico"
"subCommands"=""

[HKEY_CURRENT_USER\Software\Classes\*\shell\makeTx\shell\txconvert]
"MUIVerb"="convert to .tx"
[HKEY_CURRENT_USER\Software\Classes\*\shell\makeTx\shell\txconvert\command]
@="cmd /k %%MAKETX%% \"%1\" --opaque-detect --constant-color-detect --monochrome-detect --fixnan box3 --oiio --attrib tiff:half 1 -v -u --unpremult --oiio --format exr"
As mentioned previously, creating keys by their path, and setting values on those keys.
On the first line, we always have to put this text :
Windows Registry Editor Version 5.00
The next important step will be to determine the root location of the key to use. This location will determine on which type of file explorer entities the action in the context menu will appear.
Here are the few options available :
| All Files | HKEY_CURRENT_USER\Software\Classes\*\shell\ |
| By File Extension [1] | HKEY_CURRENT_USER\Software\Classes\SystemFileAssociations\{EXTENSION}\shell |
| Directories | HKEY_CURRENT_USER\Software\Classes\Directory\shell |
| Directories Background | HKEY_CURRENT_USER\Software\Classes\Directory\Background\shell |
| Drive | HKEY_CURRENT_USER\Software\Classes\Drive\shell |
As makeTx (and most CLI) is designed to work on files we need to choose between the 2 first keys. As a lot of image format can be converted to makeTx we are going to play the lazy card and just assume we want to this option on all file formats so we will be using the first root key.
Great, we have now the root path for each key. Now time to create the first key.
We just need a name for it (special-character-free). No need to think to hard,
we will be using just makeTx.
Let’s put that into the reg file :
Windows Registry Editor Version 5.00

[HKEY_CURRENT_USER\Software\Classes\*\shell\makeTx]
You notice that I added a new key location shell after our root key. It’s
needed by Windows. Now we can configure our key. We can start by configuring
which text will appear in the context-menu for this key :
Windows Registry Editor Version 5.00

[HKEY_CURRENT_USER\Software\Classes\*\shell\makeTx]
"MUIVerb"="makeTx"
I could have put any sentence between the 2 double quotes, but I decided to stay simple.
Then you might want to add a icon next to your action. It can be achieved like :
Windows Registry Editor Version 5.00

[HKEY_CURRENT_USER\Software\Classes\*\shell\makeTx]
"MUIVerb"="makeTx"
"icon"="F:\\blog\\demo-icon.ico"
But you have to keep in mind :
- You have to put an absolute path (starting from the drive letter, not relative)
- You have to escape backward slashes like
\->\\ - You have to use an
.icofile. There is plenty of online converter for it. - If for whatever reason the path doesn’t exists/is not valid, you will get a default “sheet” icon.
And finally the most important option, what is executed when clicking on the action !
We have to create a new key command and then configure it.
For the configuration we will pass a string as you would execute the program
from the command prompt.
Windows Registry Editor Version 5.00

[HKEY_CURRENT_USER\Software\Classes\*\shell\makeTx]
"MUIVerb"="makeTx"
"icon"="F:\\blog\\demo-icon.ico"

[HKEY_CURRENT_USER\Software\Classes\*\shell\makeTx\command]
@="D:\\resources\\maketx.exe"
If you remember what we tested previously, this will only display the documentation of makeTx, cause we doesn’t provide any argument. But let’s move step by step and test what we already have.
Executing the .reg file
Save your reg file from your text/code editor and double click on it. Windows will gift you 3 dialogs to accept, but that will be all you have to do.
As a safety, let’s manually check in the registry if it was registered. Open the
Registry Editor (you can use windows search). In the window that opens,
find the “current path” field, right under the menu bar. Inside paste
the path of the key we created and press enter.
The editor should directly browse to the key.
If you would want to delete what we did, you could just delete the makeTx
key (but we will see an alternative later).
It’s a good practice that when you follow this tutorial, you casually have a look in the Registry Editor to check everything is updated as expected.
Aright in theory it should work, what about practice ? Well pick any file
in the file explorer (because remember we put it under * which work for
all file extensions) and right click on it. You should now see the makeTx
action near the top !
Let’s test it, click on it :
Well … it just open and close. Not very useful … But this is normal, remember what I explained in the Command Line Interfaces programs, the program execute its task and then close. If we want to keep its result displayed we have to open it from the command line. And that’s a task for the next section !
Editing the registry: Advanced
The previous section allowed us to add a new simple action to the context menu, that just execute the application we gave it. But we are still missing plenty of use-cases, like how to keep the interface open in the case of a CLI, or even more importantly, how do we pass the path of the file we right-clicked on, to the command executed ?
Calling the command prompt
Let’s address the issue we stopped the previous section at. As our tool is a CLI, it close once finished. But we want to keep its result visible. Manually the solution was to execute it from an existing command prompt window. And we will do exactly the same for our context-menu action.
Get back to out .reg file and the last line where we define our command to execute.
To open the command prompt we simply need to prefix our command with
cmd /k, so we have:
Windows Registry Editor Version 5.00

[HKEY_CURRENT_USER\Software\Classes\*\shell\makeTx]
"MUIVerb"="makeTx"
"icon"="F:\\blog\\demo-icon.ico"

[HKEY_CURRENT_USER\Software\Classes\*\shell\makeTx\command]
@="cmd /k \"D:\\resources\\maketx.exe\""
By safety we also wrapped our path between escaped double quotes, to make sure the command prompt doesn’t complain.
Save the reg file and execute it again. Find a file again, and execute the action in the context-menu as previously.
We now have a command prompt window that open and execute the maketx.exe program. But as intended, the window stays open because it was not opened by maketx but by us. Nice.
Retrieving the file selected in the command
Probably the most interesting option for our context-menu. We selected a file by right-clicking, this mean we want to execute a program on it, by passing the path of this file to the program.
For now our makeTx action only open the documentation of the program cause it doesn’t receive any argument. By passing the path of the file it should now start the conversion.
To retrieve it simple we will be using the %1 variable (it simply retrieve
the first argument passed to the command line, which is the path of the file) :
Windows Registry Editor Version 5.00

[HKEY_CURRENT_USER\Software\Classes\*\shell\makeTx]
"MUIVerb"="makeTx"
"icon"="F:\\blog\\demo-icon.ico"

[HKEY_CURRENT_USER\Software\Classes\*\shell\makeTx\command]
@="cmd /k \"\"D:\\resources\\maketx.exe\" \"%1\"\""
Again we wrap it between escaped double-quotes by safety BUT we also now double the first and last quotes, necessary when this more that one pair of quotes [4]. Else we will get a very funky behavior.
Repeat the usual steps to tests, and you should now see the file right-clicked properly converted to tx (if you selected an image format selected by maketx of course).
Passing more arguments
You remember at the beginning that I extracted the full command used by maketx on an existing .tx file ? There was a lot of additional arguments used. Let’s add them. As on my side I am using maketx from the Arnold installation I will remove all the argument that maketx will already add for me anyway (explained at the beginning of the article).
Windows Registry Editor Version 5.00

[HKEY_CURRENT_USER\Software\Classes\*\shell\makeTx]
"MUIVerb"="makeTx"
"icon"="F:\\blog\\demo-icon.ico"

[HKEY_CURRENT_USER\Software\Classes\*\shell\makeTx\command]
@="cmd /k \"\"D:\\resources\\maketx.exe\" \"%1\"\" -v -u --unpremult --format exr"
No need to escape the argument this time.
Test again, you should mainly see much more info being displayed as we used the
-v option which means “verbose”.
And at that state we have a totally working command 🥳, but don’t leave yet, we still have a few improvements to make !
Creating a “uninstall” reg file
For now we have a single file that allow us to create the keys in the registry. But what if we want the inverse, meaning removing them ? All program can be installed and uninstalled, so it should be the same for our context-menu action.
As mentioned before you could manually dig into the registry to delete the key, but if we took the time to create a reg file, it’s not to end up browsing the registry manually to revert it.
The solution is to create a new reg file that delete the keys instead of adding them. To start just copy/paste the existing reg file we have been creating. Also open it in your text/code editor. And now very simple edit, in front of each key path, after the first bracket, add a minus character :
Windows Registry Editor Version 5.00

[-HKEY_CURRENT_USER\Software\Classes\*\shell\makeTx]
"MUIVerb"="makeTx"
"icon"="F:\\blog\\demo-icon.ico"

[-HKEY_CURRENT_USER\Software\Classes\*\shell\makeTx\command]
@="cmd /k \"\"D:\\resources\\maketx.exe\" \"%1\" -v -u --unpremult --format exr\""
That’s about it. It’s enough to tell Windows to remove the keys instead of creating them. You could simplify the file by removing the line setting values but I will leave them so I can remember exactly what I’m removing.
Now that you have 2 files (good idea to keep them side by side), you will need to remember that if you add a new key / edit an existing one in the “create” reg file, you also need to propagate the changes in the “uninstall” reg file.
And we end up with a pretty robust workflow, “install” your custom context-menu in one double-click and “uninstall” it the same way ! Without having to remember which key you added or manually browsing the registry editor.
Using environment variables for robustness
In all the previous examples we have been using an absolute path to
maketx.exe. Let’s imagine your directly picked the maketx located in your
Maya Arnold installation, or whatever other DCC. What happens if you uninstall
that version ? Well your command will break. You will have to edit the reg file
with the new maketx path and edit it again …
But wait ! I could just copy maketx.exe to one of my personal resources directory so I’m sure it will not be deleted when uninstalling Arnold !
And you’d be right, maketx is a standalone program that doesn’t need anything else to work so you could just copy it anywhere else. But what happens when you want to upgrade your maketx version ? Or you move it. Well you have to go find and update the reg file to execute it again. Not the most annoying task, but we can do better.
Introducing environment variables. A system wide way to set and query values. I will not make a full tutorial on them so we will skip to the essential. Feel free to browse the internet to learn more about them.
- In the Window search bar type “environment” and select “Edit Environment variable”
- Select Edit
- Create a new variable at user level
- Fill the values, we will be naming it
MAKETX. (Do NOT wrap it in quotes like in the example picture). - “Ok” for all dialogs.
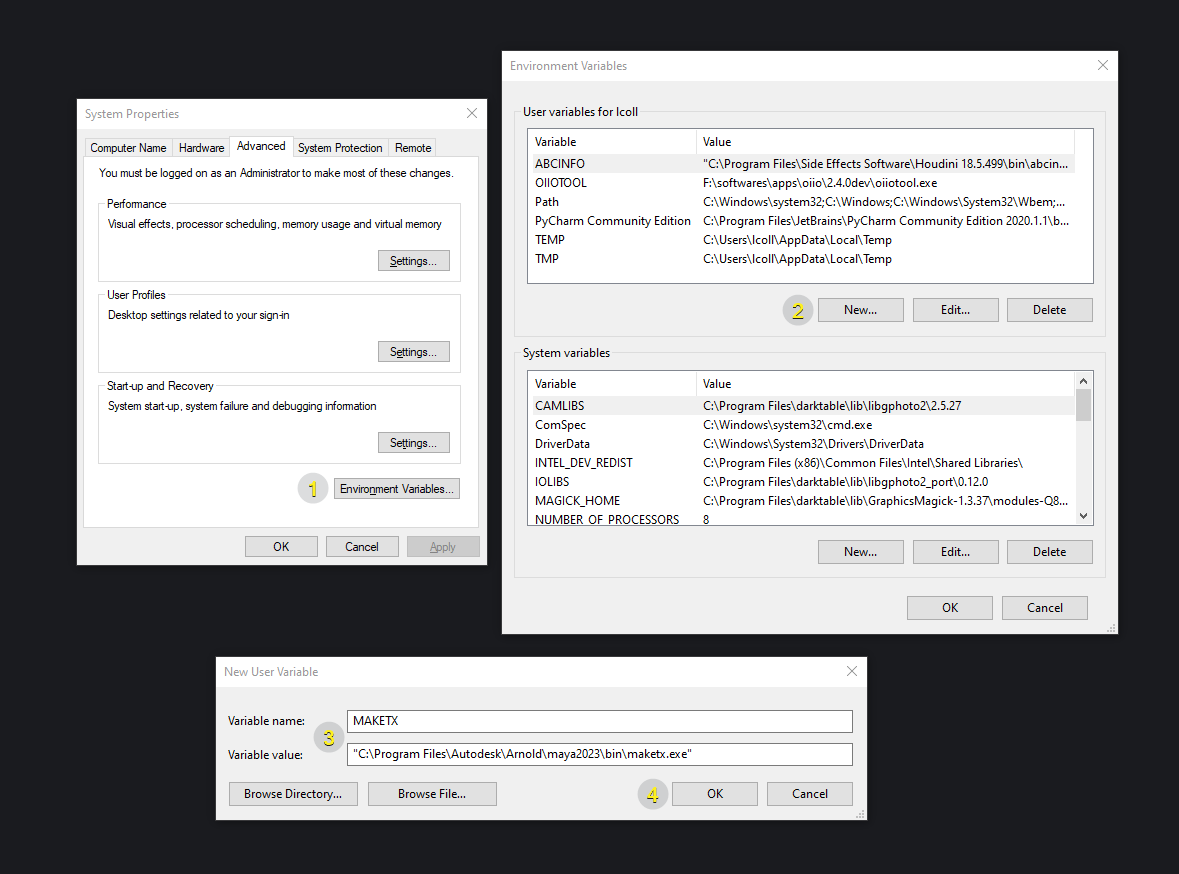
And now to get the environment variable value in our command we need to use
the batch syntax
%ENVVARNAME% :
Windows Registry Editor Version 5.00

[HKEY_CURRENT_USER\Software\Classes\*\shell\makeTx]
"MUIVerb"="makeTx"
"icon"="F:\\blog\\demo-icon.ico"

[HKEY_CURRENT_USER\Software\Classes\*\shell\makeTx\command]
@="cmd /k \"\"%%MAKETX%%\" \"%1\"\" -v -u --unpremult --oiio --format exr"
A lot going on the “escaping” side here (it is teh biggest source of issue) :
- the
%need to be escaped by doubling it so the variable is resolved only when cmd dialog is opened. - we again need to escape the variable MAKETX with quotes around it as it’s a path.
Like for
%1 - we need to double escape the first and last quotes in the whole command again (needed when there is more than 2 quotes in the command) [4]
Same routine, save and test. Everything should just work like before.
Hopefully you should never have to get back to your reg file to edit it now.
Creating sub-menus
One feature that you might want to use, would be to have nested menus. For example the default “Open With” menu offer multiple options once hovered.
With our example it would be nice to have multiple maketx options, one for Arnold, one for Renderman, one with a colorspace conversion, …
Windows Registry Editor Version 5.00

[HKEY_CURRENT_USER\Software\Classes\*\shell\makeTx]
"MUIVerb"="makeTx"
"icon"="F:\\blog\\demo-icon.ico"
"subCommands"=""

[HKEY_CURRENT_USER\Software\Classes\*\shell\makeTx\shell\txconvert]
"MUIVerb"="convert to .tx"
[HKEY_CURRENT_USER\Software\Classes\*\shell\makeTx\shell\txconvert\command]
@="cmd /k \"\"%%MAKETX%%\" \"%1\"\" -v -u --unpremult --oiio --format exr"
What happened ?
- Well first you can see our root key got a new value set with
"subCommands"="". - We then added a new sub-key. For that we took the root
key path and added
shell\+ a new custom name for that key - that new key can use the same options as the root key so I used
MUIVerbagain to set the text displayed in the interface.
I could create a new sub-key from it, and so on and so on … but let’s stop
here. Copy/paste the last key path and append \command as before then add
the command to execute.
And finally here is the full maketx example with 3 sub-commands :
Windows Registry Editor Version 5.00

[HKEY_CURRENT_USER\Software\Classes\*\shell\makeTx]
"MUIVerb"="makeTx"
"icon"="F:\\blog\\demo-icon.ico"
"subCommands"=""

[HKEY_CURRENT_USER\Software\Classes\*\shell\makeTx\shell\txconvert]
"MUIVerb"="convert to .tx"
[HKEY_CURRENT_USER\Software\Classes\*\shell\makeTx\shell\txconvert\command]
@="cmd /k \"\"%%MAKETX%%\" \"%1\"\" -v -u --unpremult --format exr"

[HKEY_CURRENT_USER\Software\Classes\*\shell\makeTx\shell\txconvertprman]
"MUIVerb"="convert to Renderman .tx"
[HKEY_CURRENT_USER\Software\Classes\*\shell\makeTx\shell\txconvertprman\command]
@="cmd /k \"\"%%MAKETX%%\" \"%1\"\" --prman -v -u --unpremult --format exr"

[HKEY_CURRENT_USER\Software\Classes\*\shell\makeTx\shell\txconvertsrgb]
"MUIVerb"="convert to .tx - sRGB source"
[HKEY_CURRENT_USER\Software\Classes\*\shell\makeTx\shell\txconvertsrgb\command]
@="cmd /k \"\"%%MAKETX%%\" \"%1\"\" --colorconvert sRGB linear -v -u --unpremult --format exr"
Auto-generating the .reg files
For the more technical person that will be reading this article. I already simplified all the steps above by creating a python CLI.
It allow to write the key structure as a json with a bunch of workflow optimizations, like relative paths, variables, … so the whole process should be much faster and much less human-error prone.
Cool use cases ideas for context-menus
Because maketx is not the only program that is cool to have available has a right click, here is a few ideas that could really boost your workflow !
maketx
Even more of it !
txify entire folders
With what we saw we can quickly convert all the texture in a directory by selecting them all, and running the context-menu. But we could also implement this by selecting a directory and executing the context menu from it.
Of course maketx doesn’t accept directories so we need to retrieve files from it. We will be creating the usual intermediate batch file :
@echo off

for %%i in ("%1\*.exr", "%1\*.tiff", "%1\*.png") do (
    echo - processing %%i
    start "maketx" /b "%MAKETX%" %%i -v -u --unpremult --oiio --format exr
)
What’s going on :
("%1\*.exr")we find all files with the .exr extension in the given directory (and we can ask multiple extensions separated by a comma)startwe launch the maketx process in a new command prompt. They are launched “asynchronously” which mean all the command are started without waiting for the previous one to complete. Sometimes called multi-threading."maketx"that new command prompt is named “maketx”\bwe actually don’t want to display this new command prompt. This also mean that all text outputs is logged in the current prompt in a pure asynchronous chaos (so you can omit it if you prefer)
You can try it without the start "maketx" \b and you will see that each
command will be executed one after the other which will take much more time.
The keys to add in the reg files can looks like this :
[HKEY_CURRENT_USER\Software\Classes\Directory\shell\maketx\shell\convertall]
"MUIVerb"="Convert all images to .tx"
[HKEY_CURRENT_USER\Software\Classes\Directory\shell\maketx\shell\convertall\command]
@="cmd /k \"\"F:\\softwares\\os\\config\\contextmenus\\maketx\\batch\\convert_dir.bat\" \"%1\"\""
If you wish to process the directory recursively, you can use the /R flag [5] :
@echo off

for /R "%1" %%i in (*.exr, *.tiff, *.png) do (
    echo - processing %%i
    start "maketx" /b "%MAKETX%" %%i -v -u --unpremult --oiio --format exr
)
colorspace conversions
In the final maketx example you may have noticed I created an action that assume the source texture is sRGB “Display” encoded and is converted to sRGB Linear. It’s pretty common to have colorspace conversion as all tx should be encoded in the rendering colorspace.
To perform the colorspace conversion I used the --colorconvert sRGB linear argument.
The 2 “colorspaces” names I’m giving are builtins [6] but there is only 3 of
them so if you need anything different we will have to rely on
OCIO. If you are not familiar with it, I’m not
going to explain it sorry, too long for this article.
Here is the command updated to perform colorspace conversions based on colorspace stored in an OCIO configuration (example with the old ACES 1.2 one) :
"%MAKETX%" "%1" --colorconfig "D:\whatever\ACES\config.ocio" --colorconvert "Utility - sRGB - Texture" "ACES - ACEScg" -v -u --unpremult --format exr
OIIO Tool
I will start by the most useful of all (for a 3D artist at least). oiiotool is the CLI version of the OpenImageIO library and was designed to perform image-processing.
Just have a look at the documentation and the multiple examples it includes to get an idea of how powerful it is.
As it could handle probably hundred of actions you want to perform from a context menu, I will just show a few very useful of them.
Retrieving image statistic and metadata
Especially useful for OpenEXR files. To check what is stored inside.
Windows Registry Editor Version 5.00

[HKEY_CURRENT_USER\Software\Classes\*\shell\OIIO_Tool]
"MUIVerb"="OIIO Tool"
"icon"="F:\\softwares\\os\\config\\contextmenus\\oiiotool\\oiiotool.ico"
"subCommands"=""

[HKEY_CURRENT_USER\Software\Classes\*\shell\OIIO_Tool\shell\oiioinfo]
"MUIVerb"="Display Info"
[HKEY_CURRENT_USER\Software\Classes\*\shell\OIIO_Tool\shell\oiioinfo\command]
@="cmd /k %%OIIOTOOL%% --info -v \"%1\""
Rescaling textures
It is most common that you exported textures with large dimensions like 4096x4096 and that you need to resize them as you don’t need that much pixels.
Again with oiiotool, as fast as right click can be !
This time setting this context-menu will be more complicated. If we were to reuse the workflow we used previously we would set something like this :
[HKEY_CURRENT_USER\Software\Classes\*\shell\OIIO_Tool\shell\oiiorescale2048]
"MUIVerb"="rescale 2048"
[HKEY_CURRENT_USER\Software\Classes\*\shell\OIIO_Tool\shell\oiiorescale2048\command]
@="cmd /k %%OIIOTOOL%% -v \"\"%1\" --resize 2048x0 -o \"%~n1-2048%~x1\"\""
The issues is in the last argument of the command, where we need to pass the path
of the new file OIIO need to write. If we were to overwrite the existing file,
easy you can just give \"%1\". But here we want to create a new file.
The batch language has a special syntax to make path manipulation on variables.
Unfortunately the syntax doesn’t work when called from cmd /k.
We need a workaround to be able to use the full batch syntax. This workaround
could also be used if you need to execute more complex commands. So here we will
be using a .bat file to define our command, and the registry command will
just start the bat file.
Create a new .bat file (create a .txt and just rename the extension). Open
it with any text/code editor and inside paste the following :
@echo off

%OIIOTOOL% -v "%1" --resize %2x0 -o "%~n1-%2%~x1"
You can observe :
- we replace
2048with%2which imply we will be using the 2nd argument passed to the .bat to determine the size to rescale. With this we can use one .bat to rescale to any size ! - no need to escape quotes characters in bat files !
Save the .bat somewhere then let’s get back to our .reg file :
[HKEY_CURRENT_USER\Software\Classes\*\shell\OIIO_Tool\shell\oiiorescale2048]
"MUIVerb"="rescale 2048"
[HKEY_CURRENT_USER\Software\Classes\*\shell\OIIO_Tool\shell\oiiorescale2048\command]
@="cmd /k \"\"F:\\blog\\path\\to\\oiiotool-rescale.bat\" \"%1\"\" 2048"
Don’t forget to also escape the backward slashes in the path. You notice that we just forward the path of the file selected as first argument of the bat, and the second argument is indeed the size to use.
You can the just copy the above setup as much time as needed to have multiple size options :
[HKEY_CURRENT_USER\Software\Classes\*\shell\OIIO_Tool\shell\oiiorescale4096]
"MUIVerb"="rescale 4096"
[HKEY_CURRENT_USER\Software\Classes\*\shell\OIIO_Tool\shell\oiiorescale4096\command]
@="cmd /k \"\"F:\\blog\\path\\to\\oiiotool-rescale.bat\" \"%1\"\" 4096"

[HKEY_CURRENT_USER\Software\Classes\*\shell\OIIO_Tool\shell\oiiorescale2048]
"MUIVerb"="rescale 2048"
[HKEY_CURRENT_USER\Software\Classes\*\shell\OIIO_Tool\shell\oiiorescale2048\command]
@="cmd /k \"\"F:\\blog\\path\\to\\oiiotool-rescale.bat\" \"%1\"\" 2048"

[HKEY_CURRENT_USER\Software\Classes\*\shell\OIIO_Tool\shell\oiiorescale1024]
"MUIVerb"="rescale 1024"
[HKEY_CURRENT_USER\Software\Classes\*\shell\OIIO_Tool\shell\oiiorescale1024\command]
@="cmd /k \"\"F:\\blog\\path\\to\\oiiotool-rescale.bat\" \"%1\"\" 1024"

...
Converting images to .ico
You saw that we needed to create .ico file to give pretty icon to our
context-menus, and it’s annoying to go on some random website to convert your
images. Let’s automatize it too !
As previously, in 2 part with a .bat :
@echo off
%OIIOTOOL% -v -i "%1" --fit 256x256 --dup --resize 128x0 --dup --resize 64x0 --dup --resize 48x0 --dup --resize 32x0 --dup --resize 24x0 --dup --resize 16x0 --siappendall -o "%~n1.ico"
[HKEY_CURRENT_USER\Software\Classes\*\shell\OIIO_Tool\shell\oiioicon]
"MUIVerb"="convert to .ico"
[HKEY_CURRENT_USER\Software\Classes\*\shell\OIIO_Tool\shell\oiioicon\command]
@="cmd /k \"\"F:\\blog\\path\\to\\oiiotool-ico-convert.bat\" \"%1\"\""
The only tricky part was to know the ico format store multiple versions of the same image at different scales, but again OIIO make that pretty easy !
Convert .tx back to another format
If you ever only received/find that there only the tx left for your asset, you can use oiitool to convert them to a more readable format !
Here is just the .bat file where I convert them back to EXR :
@echo off

set "target_file=%~n1.exr"

if exist %target_file% (
    echo "Destination file already exists : %target_file%"
    set /P override_target=^> do you want to override it (y/n):
    if not %override_target% == "y" (
      exit /b
    )
)

%OIIOTOOL% -v -i "%1" --unmip -o %target_file%
Few notes :
- This time I check that the target file doesn’t already exists, we never know ! If it exists I ask the user if he wants to overwrite it else I exit.
- I use
--unmipbecause the tx is mipmapped and I don’t care about keeping them.
I let you create the keys in the reg file (also you could add it to the maketx menu if this is more logical to you).
ABCInfo
Next one : retrieving information about an Alembic file without even opening
it in a DCC. We will be using a CLI called abcinfo.exe. This CLI can only
be found in Houdini installation :
C:\Program Files\Side Effects Software\Houdini {VERSION}\bin\abcinfo.exe"
The tool is not standalone, meaning you can’t just copy it somewhere. I recommend to as always set an environment variable to it that you can easily update when you update your Houdini version.
Windows Registry Editor Version 5.00

[HKEY_CURRENT_USER\Software\Classes\SystemFileAssociations\.abc\shell\abcinfo]
"MUIVerb"="abcinfo"
"icon"="%ABCINFO%"
"subCommands"=""

[HKEY_CURRENT_USER\Software\Classes\SystemFileAssociations\.abc\shell\abcinfo\shell\001abcinfo]
"MUIVerb"="abcinfo"
[HKEY_CURRENT_USER\Software\Classes\SystemFileAssociations\.abc\shell\abcinfo\shell\001abcinfo\command]
@="cmd /k \"\"%%ABCINFO%%\" \"%1\"\""

[HKEY_CURRENT_USER\Software\Classes\SystemFileAssociations\.abc\shell\abcinfo\shell\002abcinfo_verbose]
"MUIVerb"="abcinfo verbose"
[HKEY_CURRENT_USER\Software\Classes\SystemFileAssociations\.abc\shell\abcinfo\shell\002abcinfo_verbose\command]
@="cmd /k \"\"%%ABCINFO%%\" -v \"%1\"\""
This time no need to put it in Classes\*, we only need it for .abc. I
created 2 commands, one which give most of the time the info I need, another one
that really give the maximum of info about the file.
You can also notice that for the icon we gave the path to a abcinfo.exe ! Windows will use the icon packed in the .exe (if there is one). And we also leave the environment variable that still work just fine.
ffmpeg
One of the most famous CLI. Powering most of the video-processing applications, ffmpeg is an invaluable resource for anything video-related.
As for oiiotool, the use-case for it are hundred and I will only show a few of them.
But at the opposite of oiiotool, finding a compiled version
is much easier. Download it somewhere an create an environment variable
(I picked the very original FFMPEG for the name)
video to gif
An important problem while converting video to gif is disk size. GIF are cools, but can become very heavy if not optimized, and most website have file size limitations.
So when doing a gif we always try to find a good quality/size compromise which is achieved by tweaking various parameters : resolution, fps, dithering, …
You could make a bunch of context-menu action with various “preset” of optimization but you will always find yourself with a specific case that need to be under a certain size, …
So here we will be doing something new : we will ask the user for input on variables for the conversion.
Generating optimized GIFs will require a pretty complex command. We will create a .bat file to store it, and call the batch file from the context menu.
@echo off

set ask_user=1
if not "%~2" == "" (
    set ask_user=%2
)

if %ask_user% equ 0 (
    set framerate=%3
) else (
    set /P framerate=- Target framerate:
)

if %ask_user% equ 0 (
    set scale_divide=%4
) else (
    set /P scale_divide=- Target Size Divider:
)

set "file_suffix="
if %ask_user% equ 0 (
    if not "%~5" == "" (
        set file_suffix=%5
    )
) else (
    set /P "file_suffix=- File name suffix (optional):"
)

set "dithering=sierra2_4a"
if %ask_user% equ 0 (
    if not "%~6" == "" (
        set dithering=%6
    )
) else (
    echo " # DITHERING methods"
    echo "     none"
    echo " # higher scale = less visible dotted pattern but more banding"
    echo "     bayer:bayer_scale=0"
    echo "     bayer:bayer_scale=1"
    echo "     bayer:bayer_scale=2"
    echo "     bayer:bayer_scale=3"
    echo "     bayer:bayer_scale=4"
    echo "     bayer:bayer_scale=5"
    echo " # (popular) lighter than bayer"
    echo "     floyd_steinberg"
    echo " # even lighter, very pronounced banding"
    echo "     sierra2"
    echo " # (default) heavy, subttle dot pattern with few banding."
    echo "     sierra2_4a"
    set /P dithering=- Dithering method:
)

set "output=%~n1%file_suffix%.gif"
set "filter_graph=fps=%framerate%,scale=iw/%scale_divide%:-1:flags=lanczos,split[s0][s1];[s0]palettegen[p];[s1][p]paletteuse=dither=%dithering%"


:: -y : overwite existing, else use -n
%FFMPEG% -y -i "%1" -threads 0 -loop 0 -vf %filter_graph% %output%
But we make sure the script can still be used without having to enter a manual input. It’s achieved by checking if there is a second argument provided and if that argument equal one. With that bat we can then create the following reg file :
Windows Registry Editor Version 5.00

[HKEY_CURRENT_USER\Software\Classes\*\shell\ffmpeg]
"MUIVerb"="ffmpeg"
"icon"="F:\\softwares\\os\\config\\contextmenus\\ffmpeg\\ffmpeg.ico"
"subCommands"=""

[HKEY_CURRENT_USER\Software\Classes\*\shell\ffmpeg\shell\001togif_ask]
"MUIVerb"="convert video to .gif - interactive"
[HKEY_CURRENT_USER\Software\Classes\*\shell\ffmpeg\shell\001togif_ask\command]
@="cmd /k \"F:\\softwares\\os\\config\\contextmenus\\ffmpeg\\ffmpeg-togif.bat\" %1 1"

[HKEY_CURRENT_USER\Software\Classes\*\shell\ffmpeg\shell\002togif_presets]
"MUIVerb"="convert video to .gif [presets]"
"subCommands"=""

[HKEY_CURRENT_USER\Software\Classes\*\shell\ffmpeg\shell\002togif_presets\shell\003togif502sierra]
"MUIVerb"="convert video to .gif - fps:50 size:/2 dithering:sierra2_4a"
[HKEY_CURRENT_USER\Software\Classes\*\shell\ffmpeg\shell\002togif_presets\shell\003togif502sierra\command]
@="cmd /k \"\"F:\\softwares\\os\\config\\contextmenus\\ffmpeg\\ffmpeg-togif.bat\" %1 0 50 2 \"\"\" sierra2_4a"

[HKEY_CURRENT_USER\Software\Classes\*\shell\ffmpeg\shell\002togif_presets\shell\004togif501sierra]
"MUIVerb"="convert video to .gif - fps:50 size:/1 dithering:sierra2_4a"
[HKEY_CURRENT_USER\Software\Classes\*\shell\ffmpeg\shell\002togif_presets\shell\004togif501sierra\command]
@="cmd /k \"\"F:\\softwares\\os\\config\\contextmenus\\ffmpeg\\ffmpeg-togif.bat\" %1 0 50 1 \"\"\" sierra2_4a"

[HKEY_CURRENT_USER\Software\Classes\*\shell\ffmpeg\shell\002togif_presets\shell\005togif501floyd]
"MUIVerb"="convert video to .gif - fps:50 size:/1 dithering:floyd_steinberg"
[HKEY_CURRENT_USER\Software\Classes\*\shell\ffmpeg\shell\002togif_presets\shell\005togif501floyd\command]
@="cmd /k \"\"F:\\softwares\\os\\config\\contextmenus\\ffmpeg\\ffmpeg-togif.bat\" %1 0 50 1 \"\"\" floyd_steinberg"

[HKEY_CURRENT_USER\Software\Classes\*\shell\ffmpeg\shell\002togif_presets\shell\006togif242sierra]
"MUIVerb"="convert video to .gif - fps:24 size:/2 dithering:sierra2_4a"
[HKEY_CURRENT_USER\Software\Classes\*\shell\ffmpeg\shell\002togif_presets\shell\006togif242sierra\command]
@="cmd /k \"\"F:\\softwares\\os\\config\\contextmenus\\ffmpeg\\ffmpeg-togif.bat\" %1 0 24 2 \"\"\" sierra2_4a"

[HKEY_CURRENT_USER\Software\Classes\*\shell\ffmpeg\shell\002togif_presets\shell\007togif241sierra]
"MUIVerb"="convert video to .gif - fps:24 size:/1 dithering:sierra2_4a"
[HKEY_CURRENT_USER\Software\Classes\*\shell\ffmpeg\shell\002togif_presets\shell\007togif241sierra\command]
@="cmd /k \"\"F:\\softwares\\os\\config\\contextmenus\\ffmpeg\\ffmpeg-togif.bat\" %1 0 24 1 \"\"\" sierra2_4a"

[HKEY_CURRENT_USER\Software\Classes\*\shell\ffmpeg\shell\002togif_presets\shell\008togif241floyd]
"MUIVerb"="convert video to .gif - fps:24 size:/1 dithering:floyd_steinberg"
[HKEY_CURRENT_USER\Software\Classes\*\shell\ffmpeg\shell\002togif_presets\shell\008togif241floyd\command]
@="cmd /k \"\"F:\\softwares\\os\\config\\contextmenus\\ffmpeg\\ffmpeg-togif.bat\" %1 0 24 1 \"\"\" floyd_steinberg"
You can quickly see why we need an option to let he user give what parameter he needs. Else we end up with dozens of actions to cover most of the possibilities. I ended-up offering 6 presets for now. I think there is room to optimize them but did not spend the time to test what combinaison could be the most versatile.
Also remember that we are limited to max 16 keys and I’m already using 6 of them with just “presets” + 1 for the interactive + 1 for creating a sub-menu for presets !
optimized mp4 videos
One reason you migh want to use ffmpeg is to convert to one video format to another. You produced a “master” video, witht he highest quality possible, and you now want to share it on the web, which require encoding it in more optimized and light-weight formats.
ffmpeg is a hell of a tool with hundred of argument, The most difficult part is finding which argument you need to build your command. As I’m more a ffmpeg novice I took advice from more experienced users by using this guide : https://academysoftwarefoundation.github.io/EncodingGuidelines/ (which have the advantage of focusing on color-accuracy for vfx).
Let’s take the same workflow we used for gif conversion. Here is the intermediate batch file :
    @echo off

    set ask_user=1
    if not "%~2" == "" (
        set ask_user=%2
    )

    if %ask_user% equ 0 (
        set framerate=%3
    ) else (
        echo "[framerate] usually ntsc-film (23.98), 24, ntsc (29.97), 60000/1001 (59.94)"
        set /P framerate=^> framerate=
    )

    if %ask_user% equ 0 (
        set preset=%4
    ) else (
        echo "[presets] ultrafast, superfast, veryfast, faster, fast, medium, slow, slower, veryslow"
        set /P preset=^> preset=
    )

    if %ask_user% equ 0 (
        set tune=%5
    ) else (
        echo " [tune]"
        echo "     - film : use for high quality movie content; lowers deblocking"
        echo "     - animation : good for cartoons; uses higher deblocking and more reference frames"
        echo "     - grain : preserves the grain structure in old, grainy film material"
        set /P tune=^> tune=
    )

    if %ask_user% equ 0 (
        set crf=%6
    ) else (
        echo "[crf] Constant Rate Factor. Between 0 (lossless) <- 18 <- 23 <- 28 (worse)"
        set /P crf=^> crf=
    )

    if %ask_user% equ 0 (
        set reso_width=%7
    ) else (
        echo "[resolution] Target will be rescaled to the given width, while maintaining aspect ratio."
        set /P reso_width=^> resolution=
    )

    set "file_suffix="
    if %ask_user% equ 0 (
        if not "%~8" == "" (
            set file_suffix=%8
        )
    ) else (
        echo "[file_suffix] File name suffix (optional)"
        set /P "file_suffix=> file_suffix="
    )

    set "output=%~n1%file_suffix%.mp4"
    set "filter_graph=scale=%reso_width%:trunc(ow/a/2)*2:flags=lanczos:in_color_matrix=bt709:out_color_matrix=bt709"

    :: -y : overwite existing, else use -n
    %FFMPEG% -n -i "%1" -threads 0 -r %framerate% -vf %filter_graph% -c:v libx264 -preset %preset% -tune %tune% -crf %crf% -pix_fmt yuv420p -color_range tv -colorspace bt709 -color_primaries bt709 -color_trc iec61966-2-1 %output%
Much more control than the gif workflow. The reg file then looks like this (extending the reg file used for gif)
[HKEY_CURRENT_USER\Software\Classes\*\shell\ffmpeg\shell\009mp4_ask]
"MUIVerb"="convert source to optimized .mp4 - interactive"
[HKEY_CURRENT_USER\Software\Classes\*\shell\ffmpeg\shell\009mp4_ask\command]
@="cmd /k \"F:\\softwares\\os\\config\\contextmenus\\ffmpeg\\ffmpeg-mp4-optimize.bat\" %1 1"

[HKEY_CURRENT_USER\Software\Classes\*\shell\ffmpeg\shell\010mp4_presets]
"MUIVerb"="convert source to optimized .mp4 [presets]"
"subCommands"=""

[HKEY_CURRENT_USER\Software\Classes\*\shell\ffmpeg\shell\010mp4_presets\shell\011mp4_preset2]
"MUIVerb"="convert .mp4 - fps:24 size:1920 quality:medium:film:18"
[HKEY_CURRENT_USER\Software\Classes\*\shell\ffmpeg\shell\010mp4_presets\shell\011mp4_preset2\command]
@="cmd /k \"F:\\softwares\\os\\config\\contextmenus\\ffmpeg\\ffmpeg-mp4-optimize.bat\" %1 0 24 medium film 18 1920 -opti"

[HKEY_CURRENT_USER\Software\Classes\*\shell\ffmpeg\shell\010mp4_presets\shell\012mp4_preset1]
"MUIVerb"="convert .mp4 - fps:24 size:1920 quality:slower:film:12"
[HKEY_CURRENT_USER\Software\Classes\*\shell\ffmpeg\shell\010mp4_presets\shell\012mp4_preset1\command]
@="cmd /k \"F:\\softwares\\os\\config\\contextmenus\\ffmpeg\\ffmpeg-mp4-optimize.bat\" %1 0 24 slower film 12 1920 -opti"

[HKEY_CURRENT_USER\Software\Classes\*\shell\ffmpeg\shell\010mp4_presets\shell\013mp4_preset3]
"MUIVerb"="convert .mp4 - fps:24 size:1920 quality:fast:film:23"
[HKEY_CURRENT_USER\Software\Classes\*\shell\ffmpeg\shell\010mp4_presets\shell\013mp4_preset3\command]
@="cmd /k \"F:\\softwares\\os\\config\\contextmenus\\ffmpeg\\ffmpeg-mp4-optimize.bat\" %1 0 24 fast film 23 1920 -opti"
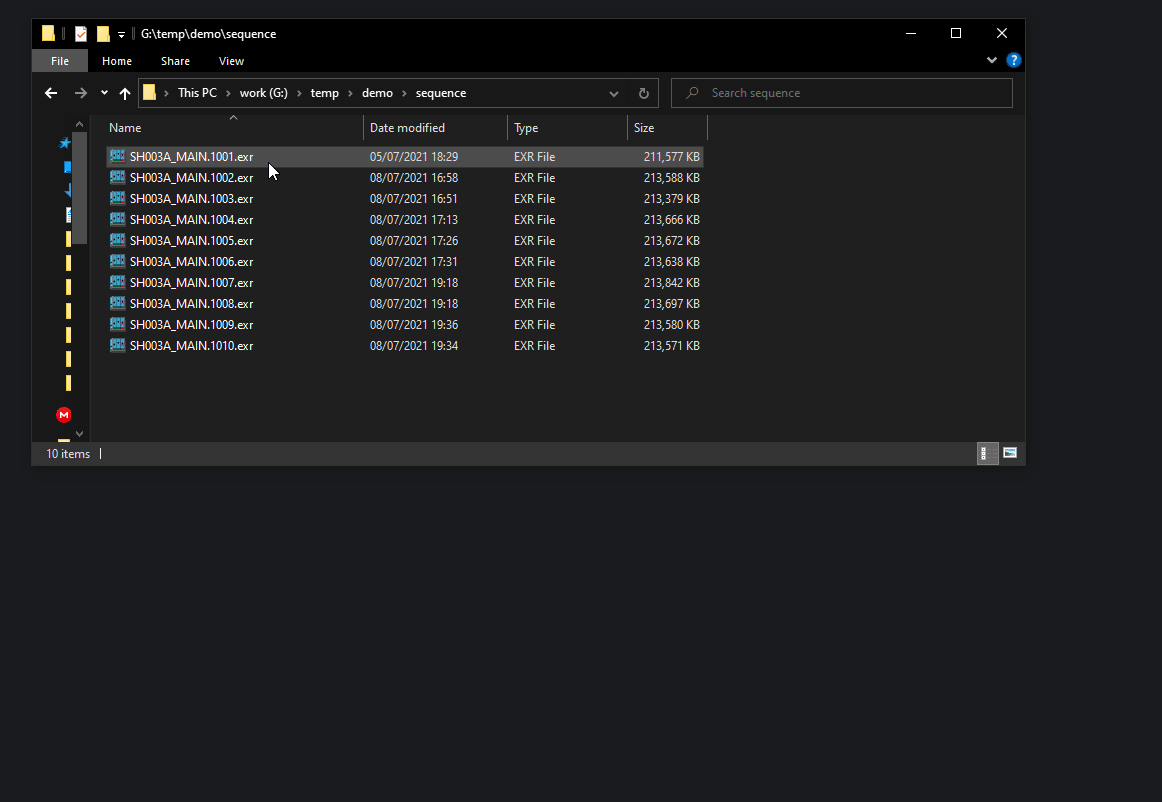
image sequence to video
And now the ultimate example, combining oiiotool and ffmpeg. The pitch is :
We have an image sequence of renders, our final scene shot with a bunch of frames.
We have been working properly and have been rendering .exr to have maximum
control for post-production. But we want to quickly check those EXRs before getting
them in our post-prod software. And as you know finding an image viewer reading
image sequence can be quite complicated. Or you just really want a video to
share with your client.
ffmpeg is directly capable of ingesting image sequences and turning them to a video. But support for exr is pretty limited, and even more for color-management. The solution is to use oiiotool to produce an image sequence that is “ready-to-go” for ffmpeg.
This behavior is described in the previous shared website https://academysoftwarefoundation.github.io/EncodingGuidelines/EncodingOverview.html#color-space-conversion– which also provide valuable informations for color management of the destination video.
But if now we think about the technical implementation, how do we pass multiple files as argument to our .bat/ffmpeg ? Well it would have been convenient that the user select the frame of the sequence that he wants to render to video, and only those frames are converted. But this is impossible. The reason being that the context menu is never aware of multiple files selected. If you select multiple files and execute a context-menu action on them, Windows will execute the command individually on each file.
If we look at what ffmpeg expect for image-sequences, we can see that luckly for us it doesn’t expect a list of file path, but a single one with a frame token. This mean the user would only need to select one file, and just replace the frame number by the token.
Unfortunately there is no way of automatizing the detection of the frame pattern easily with the resources we are using since the beginning (you could with Python for example). To keep it simple we will let the user handle that and ask him to manually replace the frame number in the file name.
@echo off

echo "Image sequence to video conversion started."
echo "  active OCIO config=%OCIO% "
echo:

echo "[abstract_file_name] Enter the file name with the frame number replace by a %d (no padding) or a %0Nd (with padding) "
echo "                     Example: asset-lookdev.v0001.0012 -> asset-lookdev.v0001.%%04d                                   "
echo "current file name is: %~n1"
set /P abstract_file_name=^> abstract_file_name=
echo:

echo "[file_suffix] File name suffix (optional)"
set /P "file_suffix=> file_suffix="
echo:

echo "[frame_expression] Enter the frame sequence expression specifying which frames to render for OIIO."
echo "                   Example: 1001-1100 render from frame 1001 to 1100                     "
set /P frame_expression=^> frame_expression=
echo:

echo "[frame_start] Enter the number of the first frame of the sequence for ffmpeg."
set /P frame_start=^> frame_start=
echo:

echo "[framerate] usually ntsc-film (23.98), 24, ntsc (29.97), 60000/1001 (59.94)"
set /P framerate=^> framerate=
echo:

echo // QUALITY :
echo:

echo "[presets] ultrafast, superfast, veryfast, faster, fast, medium, slow, slower, veryslow"
set /P preset=^> preset=
echo:

echo " [tune]"
echo "     - film : use for high quality movie content; lowers deblocking"
echo "     - animation : good for cartoons; uses higher deblocking and more reference frames"
echo "     - grain : preserves the grain structure in old, grainy film material"
set /P tune=^> tune=
echo:

echo "[crf] Constant Rate Factor. Between 0 (lossless) <- 18 <- 23 <- 28 (worse)"
set /P crf=^> crf=
echo:

echo "[resolution] Target will be rescaled to the given width, while maintaining aspect ratio."
set /P reso_width=^> resolution=
echo:

echo "[source_colorspace] OCIO colorspace name in which the input file is encoded in."
set /P source_colorspace=^> source_colorspace=
echo

echo "[target_colorspace] OCIO colorspace name in which the target file must be encoded in."
set /P target_colorspace=^> target_colorspace=
echo:

set "oiio_input=%~dp1%abstract_file_name%%~x1"
set "oiio_output_dir=%~dp1tempoiio"
set "oiio_output=%oiio_output_dir%\%abstract_file_name%.tif"

echo "[oiio_output_dir] writing %oiio_output_dir%"
MD %oiio_output_dir%

echo "(oiiotool) about to start ..."
%OIIOTOOL% -v --frames %frame_expression% %oiio_input% --colorconvert %source_colorspace% %target_colorspace% -d uint16 -o %oiio_output%

set "ffmpeg_input=%oiio_output%"

set "output=%~dpn1%file_suffix%.mp4"
set "filter_graph=scale=%reso_width%:trunc(ow/a/2)*2:flags=lanczos:in_color_matrix=bt709:out_color_matrix=bt709"

:: -y : overwite existing, else use -n
%FFMPEG% -n -start_number %frame_start% -i %ffmpeg_input% -threads 0 -r %framerate% -vf %filter_graph% -c:v libx264 -preset %preset% -tune %tune% -crf %crf% -pix_fmt yuv420p -color_range tv -colorspace bt709 -color_primaries bt709 -color_trc iec61966-2-1 %output%

echo "(ffmpeg) file written to %output%"

echo "[oiio_output_dir] removing %oiio_output_dir%"
RD /q /s %oiio_output_dir%
We reuse most of the stuff we wrote in the previous section for mp4 optimization. We now just ask even more the user
Few notes :
- A temporary folder is used to write the oiio image sequence that is then reused for ffmpeg. It got deleted at the end of the process.
- The user have to set the OCIO environment variable before, or you could improve the script by also asking the path to the ocio config to use.
- The output video is name like the initial source file. This coudl be improved but it’s the most simple solution and is not a big deal.
Again, on your own to write the registry file, nothing new here !
Creating directory hierarchies
Another common use case that doesn’t involve any external program this time ! Just creating directories. Imagine you are working in your project’s directory and there is always that folder structure you always need to recreate. Let’s make it possible in one right-click.
To make it easy to update our arborescence we will be using .bat files again.
But this time we will not get a path to a file as argument, but a path to the
initial directory to create the hierarchy from.
Let’s consider I want to create the whole hierarchy for an individual 3d asset :
@echo off

MD "%1\assetName"

MD "%1\assetName\modeling"
MD "%1\assetName\modeling\work"
MD "%1\assetName\modeling\publish"

MD "%1\assetName\rig"
MD "%1\assetName\rig\work"
MD "%1\assetName\rig\publish"

MD "%1\assetName\texturing"
MD "%1\assetName\texturing\work"
MD "%1\assetName\texturing\publish"

MD "%1\assetName\lookdev"
MD "%1\assetName\lookdev\work"
MD "%1\assetName\lookdev\publish"
Very simple, it use MD command which means “MakeDirectory” and just give it
the absolute directory path to create.
And here is the reg file :
Windows Registry Editor Version 5.00

[HKEY_CURRENT_USER\Software\Classes\Directory\shell\vfxProjectTemplates]
"MUIVerb"="VFX Projects Hierarchies"
"subCommands"=""

[HKEY_CURRENT_USER\Software\Classes\Directory\shell\vfxProjectTemplates\shell\001asset]
"MUIVerb"="create asset template"
[HKEY_CURRENT_USER\Software\Classes\Directory\shell\vfxProjectTemplates\shell\001asset\command]
@="\"\"F:\\softwares\\os\\config\\contextmenus\\dir_hierarchies\\batch\\asset_template.bat\" \"%1\"\""
I use HKEY_CURRENT_USER\Software\Classes\Directory\shell to make the menu
appear when we right-click on a directory but I could also have used
HKEY_CURRENT_USER\Software\Classes\Directory\Background\shell
as a root key so it appear when you right click on the background of the file
explorer.
Starting different version of the same DCC
Maybe you are working on multiple projects at the same time, requiring different software versions to be used. And you really would like to just double-click on your file to launch it. Well with what we learned you could at least create a context-menu to open the selected file in the given DCC version.
Here is an example with Maya :
Windows Registry Editor Version 5.00

[HKEY_CURRENT_USER\Software\Classes\SystemFileAssociations\.ma\shell\mayaopen]
"MUIVerb"="abcinfo"
"icon"="C:\\Program Files\\Autodesk\\Maya2023\\bin\\maya.exe"
"subCommands"=""

[HKEY_CURRENT_USER\Software\\Classes\SystemFileAssociations\.ma\shell\mayaopen\shell\maya2023]
"MUIVerb"="Open in Maya 2023"
[HKEY_CURRENT_USER\Software\Classes\SystemFileAssociations\.ma\shell\mayaopen\shell\maya2023\command]
@="\"\"C:\\Program Files\\Autodesk\\Maya2023\\bin\\maya.exe\" -file \"%1\"\""

[HKEY_CURRENT_USER\Software\Classes\SystemFileAssociations\.ma\shell\mayaopen\shell\maya2020]
"MUIVerb"="Open in Maya 2020"
[HKEY_CURRENT_USER\Software\Classes\SystemFileAssociations\.ma\shell\mayaopen\shell\maya2020\command]
@="\"\"C:\\Program Files\\Autodesk\\Maya2020\\bin\\maya.exe\" -file \"%1\"\""
Wait I see you are giving argument to Maya, this mean it’s a CLI ?!
Yes it is ! It’s a CLI, opening a GUI. For every .exe try to call
myDCC.exe --help and see what are the available options.
Nothing prevent you to instead of calling the .exe, calling a .bat that call the .exe but set a bunch of environment variable before, … There is plenty of cool workflow optimizations you could perform with customized context menus !
Troubleshooting
Most of the time it will be a character escaping issue.
- Making sure paths in the reg files have their backslashes escaped. Example :
C:\test\test.bat->C:\\test\\test.bat
- Making sure paths in the reg files are wrapped between double quotes. Example :
C:\\test\\test.bat->\"C:\\test\\test.bat\"
- When you have more than 1 pair of quote in your command line, you will need to
double escape them. Example :
@="cmd /k \"F:\\softwares\\ffmpeg.bat\" \"D:\\project\\specificvideo.mp4\""
need to be converted to
@="cmd /k \"\"F:\\softwares\\ffmpeg.bat\" \"D:\\project\\specificvideo.mp4\"\""
By doubling the first and last double-quote.
More on that here : https://ss64.com/nt/syntax-esc.html
Those rules are for the commands in the reg files. Not for batch files !
Do not hesitate to join the discord linked below and ask, if you have any more issue.
Changelog
13-07-2023: fixed some%1argument not wrapped in quotes. Thanks to Slava.
References
- 1.
- ^ https://stackoverflow.com/a/47745854/13806195
- 2.
- ^ https://stackoverflow.com/questions/48625223/is-there-a-maximum-right-click-context-menu-items-limit
- 3.
- ^ https://en.wikipedia.org/wiki/Batch_file
- 4.
- ^ a b https://ss64.com/nt/syntax-esc.html
- 5.
- ^ https://ss64.com/nt/for_r.html
- 6.
- ^ https://openimageio.readthedocs.io/en/latest/maketx.html#cmdoption-colorconvert
- 7.
- ^ https://openimageio.readthedocs.io/en/latest/maketx.html#cmdoption-colorconfig
- 8.
- ^ https://en.wikibooks.org/wiki/Windows_Batch_Scripting#Percent_tilde